Amazing What A Little Color Can Do!

Self high-five – Today we’ve been in the new house for 1 one month and I finally got paint on the walls!

Sure it seems that we’ve been here for a lot longer than that to me, but for some reason, I also have no concept of time here! I feels more like I’m back in middle school and on summer vacation – I don’t have to get up early and of course there’s nothing wrong with eating cereal for breakfast, lunch, and as a snack! But add in the perks of being an adult, like driving and not having to rely solely on allowance money, and that pretty much sums up my last month. A blurry lucky charms modge podge kind of a month.

So what have I been doing over the last 30 days?

1. Unpacking
2. More unpacking
3. Hunting for ideas on Pinterest
4. Cleaning up my mess from unpacking
5. Taking naps
6. Making a lot of donations to the Good Will and the Restore
7. Stalking the aisles of Home Depot and the amazing thrift stores down here
8. Watching the World Cup

You might have noticed that directionally my brain is still stuck in Northern Virginia mode (down here?), but I’m slowing starting to visualize this house and area when I say “home”. Give me some time. We’ve only been here for 30 days!

But back to the point of this post. So one thing that I have a habit of doing is staring off into the distance and mumbling under my breath. I’m sure that D has learned to just live with it, but it’s part of my design process. That and waking up at 3 AM to hunt for inspiration pictures on Pinterest, but whatever. The good thing about this past month is that I’ve had time to mull over some ideas, cross a few off the list as not-so-muches, and to add others to it. I keep a list on my phone that contains all of my ideas, by room as they pop into my head. This way if i see or think of something, I’m not likely to forget it later, but it’s also a good way for me to go back and review what my brain mappings have been so far. It’s interesting to watch the progression.

For example, I do not like bi-fold doors. I’m not sure why, but I just don’t like them. They always seem to stick and come off the tracks or maybe it was that time I got my finger stuck in one that has left me jaded in my adult life. Whatever it is, I’m not a fan. So wouldn’t ya know that this house has them In. Every. Room!?!?! I’ve thought of alternative, spent a few hours in Home Depot sketching out a plan of attack to replace them with barn doors (who doesn’t love a great barn door?), and wrack my brain for some other type of alternative. And all of that gets added to my phone or drawn out in my LBB (little black book). The other day, my frustration came to a head and I whipped out the drill and removed the bi-folds in the pantry/catch all closet. Just the act of tearing something out made me unbelievably happy because it’s the first DIY thing that I’ve done in this house, but it’s me winning one battle in my war against the bi-fold doors. Today, that bi-fold door got donated along with some other items to the Restore. But to get to that point, I’ve already done all of my homework on learning how to build and install barn doors, picking out stains and finishes, and even shopping for the hardware. Yet just having the doors gone was enough to make me happy again, so all of that planning shall just sit on my phone either unused or resurrected at a later date.

Progress? Maybe. Kind of sorta.

But back to my 3 AM Pinterest surfings, I’ve finally started to nail down the colors that I want to use in this house. I’ve also learned that colors here are different than in NoVA. The sun is different here so the colors appear differently on the walls. The amount of sun and shade and lack of hazy will change how colors look. I put up some of my favorites that I used in the house in NoVA and none of them have really worked out down here. Which brings me to spending a lot of time in my local Benjamin Moore store, Home Depot, and Lowes to see what kind of colors I can find. So far, the house is taking on a gray, buttery yellow, and blue color scheme and those colors have meant that I have spent more time getting to know Mr. Moore than anything else. They have such a great selection but the crew at my store is quite fun to hang out with. It helps. And the advise is always free and the commentary is hilarious!

I am very proud to announce that for the first time in my life I narrowed my color swatches down to 2 for the family room/kitchen and nailed it out of the gage for the cabinet colors. Normally it takes me multiple trips and several test pots to pick something; if I pick something. Today I painted the family room and part of the kitchen (no need to do the backsplash wall) Edgecomb Gray by BM and very soon I’ll tackle the trim and update that off white color, but for now the renter’s yellow is no more…well except for the backsplash wall! I’m feeling accomplished. I also started on updating the 9×3 island.

And I would post pictures but since I haven’t nailed down any of the light fixtures yet, I now have to wait until tomorrow to take pictures  when there is natural sunlight. This is one of the drawbacks of a house with lower-ish ceilings and a husband who doesn’t understand the need to table or floor lamps. Yep that’ll have to wait until tomorrow. Besides priming the island without proper lighting isn’t the brightest thing that I’ve done, but I need to finish up the cabinets this week.

As I get ready to shut off the one light in the family room/kitchen, I can look around and nod cause the new paint makes this room look amazing!

On a different note, I’m convinced that there is money to be made in DIY. No, not from the blogging and book deals, but from the untapped potential of promoting the health benefits of DIY as a workout session. Ow! My arms hurt after all of this sanding, priming, and painting today!

Wanna see what interests me on Pinterest? 

I Like to Move It, Move It

We’ve finally done it! After well over 5  years of planning, Casa LoGalbo has finally made the big move! Where to, you may ask? A place where the bugs come in sizes and colors that I have never seen before but the skies are blue and the clouds are fluffy white and our back yard has a couple of palm trees in it. Welcome to Fort Lauderdale(ish) baby!

Having lived in Northern Virginia for way too long, it’s just in my nature to reference the city that everyone knows best so that I didn’t have to give explicit instructions as to where we actually lived. Something like this:

You: “So where do you live?”
Me: “Woodbridge.”
You: “Oh, never heard of it. Where’s that?”
Me: “Do you know 95 South? Where the Ikea is? That’s Woodbridge.”
You: “Man that’s a hike! The traffic sucks down there! I only go to Ikea when I absolutely need……”

And the conversation inevitably turns into our favorite items at Ikea and butchering the names like every other person who does not understand what umlaut and accents can do to a word.

Whereas if it had gone something like this:

You: “So where do you live?”
Me: “DC.”
You: “Oh cool. I love/Have you ever been to/Do you know…”

But the conversation can continue with going down some rabbit hole of Swedish meatballs and trading your top 10 horrific traffic moments.

At any rate, I’ll just leave it as Fort Lauderdale cause for the most part people know where that is…unless you are from or familiar with the area and then we can dive into the local haunts and thrift stores that I need to learn about and fall in love with.

But back to the move.

We finally did it! Actually it’s been a long drawn out process, but as I told D last night, once the dog is with us and not dogcationing in the kennel then it’s really real. And there he lays, napping on his new bed in a room with little to no furniture. Yep it’s official. We moved.

So my goal is to kickstart this blog again. With a to do list longer than Santa’s naughty list, I’ll be plenty busy for a while. Right now I need to kickstart myself off this couch that’s pushed back into the corner and organize a few things. Jack has already made himself at home and barks at the new washer and dryer since the sound are new to us both.

While the house is still empty, I need to finish taking some before pictures. It should be a lot of fun looking back at where we started and how things progress. But first…I need to straighten out the stuff that we carted down with us…

Fittingly enough, Pandora is playing Home. 🙂

Home is wherever I’m with you…

Home. It’s not a mythical idea and everyone has a vision of what it is, but what actually makes one? To answer that question, I think that everyone must come up with the answer for themselves. I found mine one unsuspecting evening.

I think that best way for me to express my answer to “home” is to give an analogy that most people would understand. We have all gone away on vacation or a business trip or even a weekend away. Regardless of whether or not the time away was amazing or a complete bust, there is usually a point in the time away where you get this urge to return to some other place….usually that’s going back to where you live. It could be that you just want to sleep in your own bed with your own pillows and blankets. Or that you just want to access other different clothes or shoes. Or you miss the water pressure in your shower. Or it could be something as simple as the smell. Whatever it is that triggers that desire to “go home,” when you get back and are able to experience that thing (or things) that you missed, you usually let out a sigh of contentment or relief.

And it’s that sigh that defines “home” for me.

Only that sigh happened for me when I was away from my home  traveling overseas. Kind of backward right? It came when I walked into Dominick’s apartment after our first “date.”

[back story] That evening wasn’t supposed to be a date. I had asked him to get some coffee with me so that I could explain that I was in the country for only a few weeks and that there was just too much going on in my life at the time to be involved with anyone…not to mention that I was bouncing from one country to the next every few weeks. It was hard for most guys to accept, let alone someone actually living in another country. Oh well. We see how well that “let down” turned out! 🙂 [/back story]

Turns out that we shut down the cafe talking and headed back to his place for more coffee. Walking across that threshold, the feeling of contentment that rushed over me was unlike anything else that I had experience in my life. There was something about being within those four walls and knowing that he was in them with me that completely put my soul at ease.

And that’s when I sighed.

After almost 8 years of marriage and living in numerous apartments and houses, I still experience that sigh. The only thing that’s been a constant in all of those locations has been him.

Over time I’ve realized that my idea of a house is about having a level of comfort. It’s about knowing that we have the right items in our house that make it relaxing for us to be there. Regardless of the number of square feet or the location, having what we need is a wonderful feeling, but knowing that he’s within those four walls with me makes it a home.

And that’s why this blog is called casa logalbo. It’s all about our home and the random projects that I come up with along the way to get it to that comfortable and relaxed level that’s pleasing to us both.  Now about that tagline…

Some of you may know that it’s really a lyric and the song that it comes from. Others of you not so much, so here ya go. It’s called “Home”  (appropriate right?) by Edward Sharpe and The Magnetic Zeros and part of the song goes:

Home, let me come home, home is wherever I’m with you
Our home, yes I’m home, home is when I’m alone with you

Yeah, it just fits.

home is wherever i'm with you

Billy Gets New Clothes

Well maybe I should clarify: Not Billy a person, but “Billy” my set of Ikea bookcases.

I’ve had these bookcases for well over 10 years and some how they’ve managed to survive moving to 3 different domestic addresses, and one address overseas (and who knows what they went through on the ship going across the Atlantic and back), but they are still in one piece! To say that I’m impressed is putting it lightly! I mean they are Ikea after all and we’ve all heard (or said) comments about them being ‘nothing but particle board’. I for one love that box store cause I can fill up any size car with a ton of flat boxes and completely make over a room or two for only a couple of bills! But seriously, I never really expected the bookcases to hold up as well as they have. We were both quite shocked when they made it back to the U.S. in. one. piece. Oh, did I mention that both bookcases have glass doors…as in the original glass doors that I also purchased 10+ years ago and they are still in amazing condition? Like I said, i.m.p.r.e.s.s.e.d?

Bookcases to Built Ins

Lately I’ve been looking around our basement and wondering what I can do to make it more functional and less, well, heavy. I don’t know if the Billy bookcases started my off “black-brown” phase, but pretty much everything I’ve purchased from Ikea is the same color. It makes for easy “coordination” but it also means that things started to feel too “match-matchy” and the color seems to make everything feel so weighed down.

None the less, with our Ikea shrine currently taking up residence in the basement, I’ve been studying the layout to try and figure out some way of making the basement feel more open. We have quite a large finished basement and after we moved in, things just sort of landed wherever we put them. I haven’t had much time nor energy to do much down there  other than add in some new Ikea additions! 😉

But back to Billy’s new clothes.

Aside from the color scheme being dark, I realized that what was bugging me was that it all looked like we had just moved in. Nothing is permanent. Nothing looks like it belongs. It reminds me of my first apartment and my hodgepodge decorating skillz – who else threw a scarf over a light and called it “done”? So I turn to the interwebs to get some inspiration and I kept coming back to picture after picture of built ins. While I’m new to this pinterest thing (I know, I know, I’ve just been putting it off) I searched for cabinets, and shelves, and built ins and light bulbs fireworks went off over my head.

“Let’s do built ins!” I declared one day to Dominick. Being the husband that he is, he just looked at me, slightly rolled his eyes, and agreed. [Insert note – Don’t get me wrong, he’s quite wonderful but he seriously has the patience of the a saint! I’m notorious about starting projects and not finishing them for a while months, years, decades. One day I need to share the story of our dining room and how loooooong it took me to paint ONE wall. It involved stenciling. Need I say more?]   He’s getting used to me and my “projects” but he is always encouraging me to finish them up! HA! That’s also the reason behind this blog – accountability.

So I started shopping around. Holy moly built ins are expensive! Do you know how many pairs of shoes I could buy with that kind of money?!?! I decided to look at buying assembled or need-to-be-assembled furniture to piece together a similar look. Yowzers that’s pretty pricey too!

I turned back to the interwebs and read blog after blog and looked at picture after picture and soaked up everything that some super talented people have done already. And as it turns out, Ikea’s handy dandy Billy bookcases have been used in numerous Ikea hacks and with quite wonderful results to boot! Like this or this or this (although that last example really is of true built ins).  Quite fabulous right?

Who knew that the Billy bookcases that have literally traveled the world and back would be the perfect fit for hacking built ins! They just needed some, well, new clothes.

Blue Prints 

Eureka we now have a plan! Now we just needed to figure out all of the steps. This is by far my favorite part of the DIY process. I like piecing everything together and figuring out all of the details and what it will take to get to the end result. This is also the longest part of the process…well the longest until my procrastination gets the better of me…

So this is what we came up with:

  • leave the Billys where there at as part of the basement redesign
  • put one of these between the bookcases
  • loose the glass doors
  • loose the glass shelves??? (still debating on this one)
  • adding crown moulding, baseboards, and decorative elements
  • add lighting (I’m thinking outdoor lights or sconces to try something new…i fear this may be the longest part of this project as I have yet to find something that’s “just right.”)
  • add wainscoting instead of priming  the backing boards which are the only part of the bookcases that aren’t holding up so well. Besides, the wainscoting will add some architectural detail.
  • paint wainscoting???  (We may just stick with white, but if not, we’ve gotta pick a color)
  • sand down everything!
  • prime the black-brown using Valspar Bonding Primer. Wait, whaaaattt?!?!? Yeah, it’s time to try something new. Sorry black-brown.
  • paint cabinets Decorators White by Benjamin Moore in Advance Interior  .

Phase I

So this weekend I spent some quality time with the two Billys and some primer. Starting late Saturday afternoon (for some reason that’s when the DIY bug bit me!) each shelf got sanded and then covered with three coats of primer. I knew that covering the black-brown would be a lot, but I was surprised just how many coats they would need! On Sunday the bookcases each got their three coats. I finally located the four other shelves that were still packed away and started on their three coats.

And since that thing called work is now bidding me to head off to bed, I’ll have to pick up where I left off at some point during the week, but basically I’ll need to make sure that all of the surfaces are super smooth and sand down any rough edges or areas. Anything that needs another coat (or two or three) of primer will be touched up and then we move on to adding some BM color.

So this is where I’ll end for now, but here’s a really bad iPhone picture of the current state of our basement. If I had turned the camera to the left or right, you would have gasped in the sheer amount of stuff that I have pulled out of 2 Billy bookcases and one other Ikea bookcase who’s name has slipped my mind. This is what happens when you must pick up mementos  everywhere you go…

billybookcases

la casa

Ahhh the house. For me it was love at first sight. It was one of those homes that as soon as we walked in the front door of the model home, I could see us living in the house. I could image our stuff on the walls, our furniture in the different rooms, eating breakfast in the breakfast area, hanging out on the couch watching tv….and the list goes on and on. Needless to say, I was sold.

Maybe I should rewind a bit.

After spending almost three years living overseas in the smallest apartment I have personally ever lived in, we were in Northern Virginia for all of 3 days before heading out on a much needed vacation and in that time we had to not only find a house but to put in an offer…and start the waiting process. And so began our house hunting expedition. And it was definitely a “hunt”! We saw big ones, small ones, medium size ones, ones with weird layouts and rooms in strange locations, some with yards, some with a square foot of grass that were listed as a yard, town homes, single family homes, and condos. I don’t know how we crammed that many houses into 2 days, but with our fearless realtor, Betsy, leading us, we squeezed them all in. I should mention that this took place in September 2008. If you remember, that was the height of the housing crisis. Houses were a wreck. Appliances were gone. Holes were in walls were unknown items used to be attached. Faucets were gone. Door knobs were gone. If floors could have been torn up, they would have been gone too. And yet, these torn up houses were still over our budget.

The experience was one of the strangest things I have ever been through. After a 27 hour flight (with a dog), we were tired. After looking at those houses, we were overwhelmed. Exhausted. Disappointed. Worried. Basically two jumbled messes. Even with Betsy as our guide, we didn’t think that we would find anything that we loved…or even liked…but we had to keep looking. We only temporary housing for so long and we were expecting the house buying process to take a while. On day 1 we did find one house but after putting in an offer, the family decided to rent it instead of selling it, so we were back act square one. Thankfully neither one of us were completely sold on the house, but it was the best one that we had seen and we were both ready to just cross “buy a house” off of our list. Settling is not always the best option people!

As we moved into the afternoon of day 2, we followed Betsy as she made a left into another new development. While I wanted personality. Dominick wanted new. I wanted a fixer-upper. Dominick wanted finished and turn key. The more we looked, the more the “to do” list grew and called for skills that were way out of my reach. I knew that this wasn’t the battle for me so we started looking at the model homes and apartments. It’s amazing how dejected a sad broken down house can make you feel! Model home after model home we toured. Blah and bland with builder grade items. Exciting stuff I tell ya! </sarcasm> The model homes were nice but they just didn’t have that warmth that I was looking for and the layouts didn’t suit Dominick. That was until Betsy mixed up a right and made a left.

We walked through the front door of one of the last model home we would tour and it just felt like…home. I was done. Dominick still wasn’t convinced. There were issues (price being one) but everything was minor. We saw a few more models to compare layouts and budgets, but we kept coming back to that one model in particular. It must have been kismet because as we were talking about what really was included in the 50% off finishes sale, I got a phone call and got offered my job. We were no longer a one-income family! It was almost as if  everything lined up. Planetary style yo!

As evening fell on day2, we were signing off on the paperwork, eating pizza, and picking out finishes, appliances, carpet and flooring, anything else that fell under the 50% off sale (read: mama went shopping like she was on DIY Network’s Blog House!). It was whirlwind. We didn’t have time to second guess our choices. We just went with what we liked best. It was quick and dirty, but we really didn’t have time to wait. We had to be in Florida in 2 days to catch a cruise leaving the Port of Miami! So we signed on the dotted line, er lines. Crossed all of the t’s. Dotted all of the i’s. And then decided the next morning that yes, we did want that fireplace after all! Scurry, scurry, scurry to update all of the paperwork and then we were off to start our road trip. And that, ladies and gentleman, is how we ended up in our house.

And the best part? We still feel as if it’s home and the best house for us. No seriously, we will still make comments to each other about how much we love this house and compare it to things we see on House Hunters and Property Brothers. Well, to be honest with you, I do most of the HGTV watching in this house, but every so often, I do get a hold of the remote and Dominick will give in and watch with me. But seriously, we love this house. It’s way too much for two people and three flights of stairs was waaaay too much for me when I had my knee surgery, but we still love it. And our neighbors are pretty wonderful to boot!

Fast forward to the present and we’ve been living in and with the house for quite a while. Okay 5 years and almost 7 months if you really want to know. I’ve sat in every room and thought about how I was would make it my own and what I would put where. I’ve spent countless hours reading blogs to get ideas, roaming the aisles of Home Goods to get inspired, and even painted a few rooms. I am not even close to being done with my list, but recently I decided to pull on my DIY gloves and tackle a few ideas that have been rolling around in my brain. It all started with a kitchen backsplash and a lot of convincing Dominick that yes, I actually did know what I was doing (thank you YouTube gods!), but it really is all about just getting started right?

So welcome to casa logalbo…established in 2008 and built on lot 747.

IMG_2090

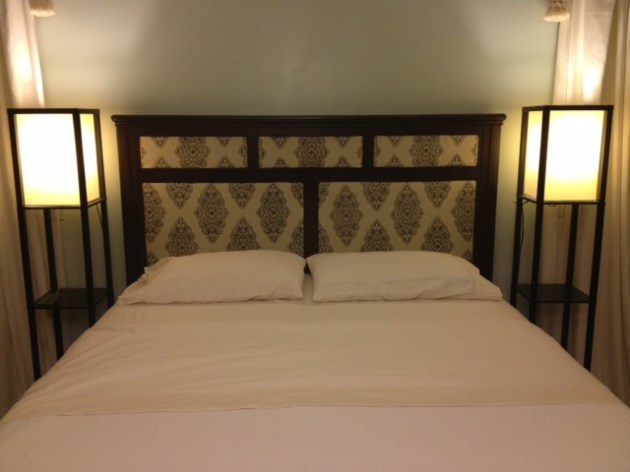
The 5 Year Headboard

Seriously? This took you 5 years?

Image

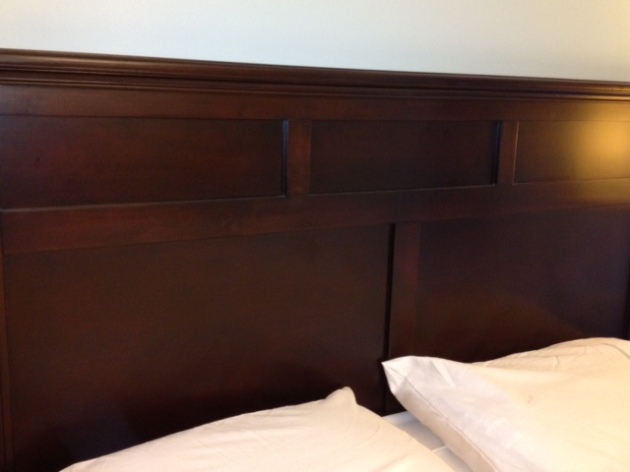
Well maybe not 5 years, but it’s been a while. I’ve a kind of “live with it until it starts speaking to you kind of person.” I’m not quite sure when it happened, but our headboard definitely jumped the speaking phase and went right to taunting me. At first I thought it was just my imagination, but it didn’t matter which sheet set I used, of often I switched out the comforter, or how many decorative pillows I bought, it still taunted me. (Because of this, I have also learned that I am not a fan of decorative pillows on a bed!) It’s a tall headboard with baton detailing and well, that’s about it. While I still like the lines of it, but it’s just turned into a large deep chocolate brown piece of furniture. Much like the rest of our bedroom suite, but as only half of a 2 person relationship, this is where the art of compromise comes into play. So the idea of painting or restaining was ruled out. More so due to the sheer weight of the furniture (we are talking about needing-to-hire-some-guys-to-move-it-all-down-a-flight-of-stairs-out-to-the-deck-and-back kind of heavy!) And really? Dominick was opposed to the painting/restaining idea from the start so I waited until I was struck with some divine inspiration or something…

Jump to the present day, or if you are looking at a calendar, 5 years later.

I’m hooked on a blog called YoungHouseLove (one of my many lovely finds via HGTV magazine) and there’s a post about reupholstering a Craigslist rocking chair. Hello divine inspiration! Whodathunk that you can reupholster with cardboard!

Yeah, you read that right. Cardboard!

But why not use cardboard? I knew that painting/restaining were out and I needed to find a solution that was semi-permanent and when we/he/I got sick of the fabric I could swap it out. A couple of huge free boxes from work and I had my back board ready. Next stop – fabric!

Oh fabric! How you are the death of me! Shopping for fabric is like shopping for shoes and trying to pick out the right gelato flavor. You have to try and sample everything. It must look and feel just right. The color, the texture. It to be just. right. This was honestly the longest part of this project. I’m picky and and even though this project was super simple, I didn’t want to just throw any ol’ fabric up there. I was going to wake up to this every morning afterall! Sure I spent quite a few hours in my local Joanne’s Fabrics and countless more online pouring over prints, but nothing really caught my eye. Or at least anything that I would take home and show Dominick.

So I waited.

And waited.

And waited.

As my hobbit-esque quest for fabric continued, I got my next edition of a HGTV magazine (recognize a theme yet?), I stumbled across a slight blurb about fabric.com and thought, “Oooh! I need to check this out!” (Yes, I know this it kinda goes against the “touch and feel” part of buying fabric, but behold! They have swatches!)

I found this, this, this, and this before I fell in love with this. And better yet, Dominick liked it too! Well… it was more of a “hey do you like this?” and not a “hey, I’m gonna redo our headboard. What do you think of this?” kind of question. After seven years, when it comes to my DIY projects, I’ve learned that some things just need to have a simple level of buy in cause with some things he’s a finished project kind of guy (but I’ll get to his final comment about this later). Yes, I know that my Monroe Murcury/Oatmeal fabric wasn’t on the cheap side ($12.98 a yard = yowzers!), but it was definitely less then the $24.98 a yard for the fabric that sorta liked at Joanne’s. So I guess could totally justify it! 😉

My List

I have lists about lists. As in I carry around a notebook and keep lists on my phone. My list for this project?

Cardboard? Check. (and it was free!)
Fabric? Check. (not so free but oh so beautiful!)
Duct tape? Check. (wait…duct tape?)
Velcro strips? Check. (you’ll see)
Staple gun with 1/4” staples? Check.
Scissors? Check.
Measuring tape? Check.
Pencil? Check.

Measure Twice, Cut Once

Now that I had my fabric and the rest of the items on my list, I just needed to implement my plan.

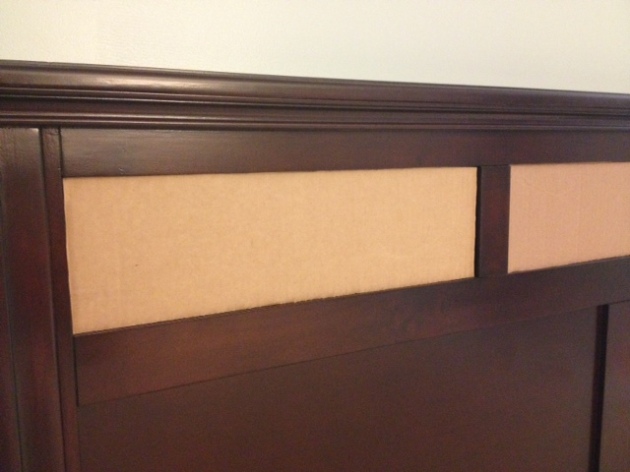
The headboard has great bones. I just needed to add some blush and lipstick to glam it up a bit. There are 3 insets across the top (18 1/4 x 5 5/16″), two larger ones below (27 3/4 x 28 1/2″) and each is 5/8″ deep. I know that the two larger ones don’t look that big, but our mattress and boxspring are rather high.

Image

For each nook, I cut out a piece of cardboard to fit inside.

Image

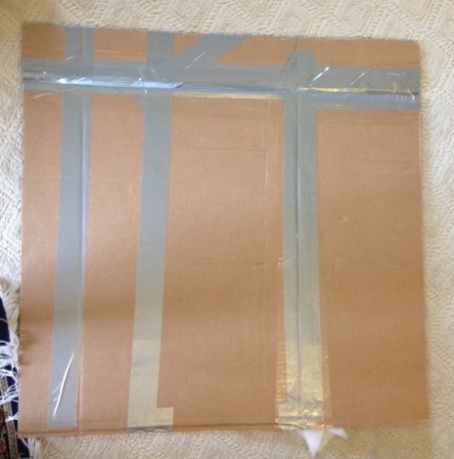
I cut each a tad bit shorter to compensate for the added width and bulk the batting and material would add, but with the extra weight on the cardboard the last thing I wanted was for it to start bowing or sagging. So for the bottom pieces, I enlisted the help of duct tape. Besides with sizes like this, I had to include flaps and seams to make sure that I cutout was big enough, so the cardboard tended to want to go all bendy.  To make the bigger pieces more rigid, I added duct tape, like so…

Image

Sadly I ran out of duct tape and had to switched to packing tape, but I figured no one would ever see this, so who cares what the pretty factor was! (and then I go and add this picture into my blog! Ha!)

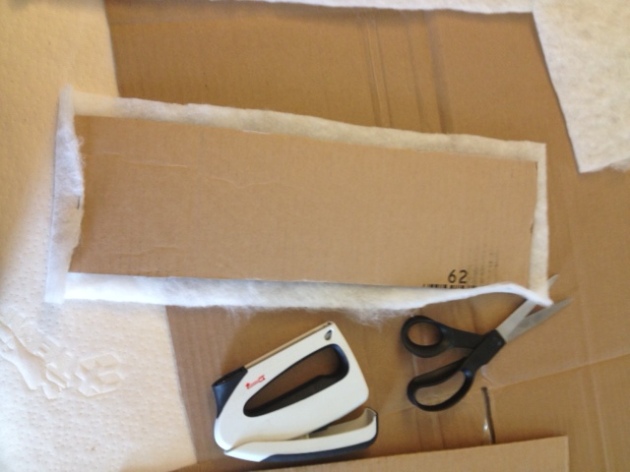
Next came the batting. I used hi-loft batting because I wanted a fuller look without having to use extra batting. I was worried about having a depth of only 5/8″ and the headboard looking “stuffy” instead of “chic”. At the most, I figured two layers of hi-loft would be my best bet. I stuck with just one.

I cut the batting to be roughly 1 inch extra around the edges. I say roughly because sometimes my cutting skills were spot on; other times, not so much. Image

I used a staple gun with 1/4″ staples and started stapling the batting to the cardboard. You may be wondering if the 1/4″ staples were too big, and the answer is sort of. If any didn’t fold like they should, I used the leatherman (or a pair of pliers will work as well) and bent the staple closed. The last thing I needed was something sharp sticking either one of us in the back of the head as we lean against the soon to be cushy headboard!

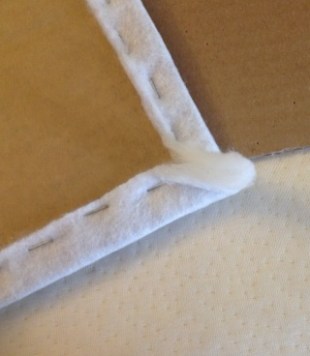
As I got around to my corners, I figured the best way to get the batting to lay flat was to staple it into a triangle.

Image

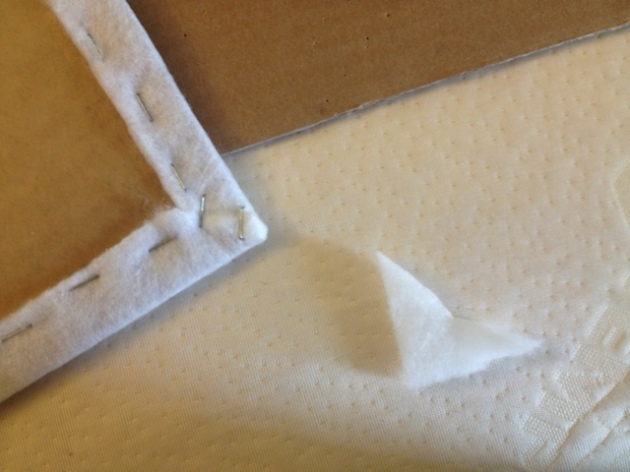
Next i just snipped off the triangle on top (not too much) and stapled the two sides down.

Image

Rinse and repeat.

With all five pieces of cardboard stapled to kingdom come (yeah I seriously over did it with the staples, but the staple gun was new and I needed to thoroughly test it out!), the next was to figure out my layout of the medallions. We started with the bigger panels as they would set the tone for the rest of the design. We moved and rearranged the fabric until we decided to go with a reflective pattern. In other words once they were side by side, the pattern on the two larger panels would appear to repeat to continue across the baton. I didn’t take a picture of this process (as I was busy moving around the fabric with Dominick, and I’m still new at this!) but you can get an idea of what I’m talking about here:

Image

(I know it’s a horrible picture!)

Now that we had the pattern for the two larger panels set, we moved on to stapling the fabric on. When it came time to staple and snip the corners, I just followed the steps that I watched here. Super easy and I got really clean and flat corners.

Once all five panels were ready, we started to insert them into each slot. For the bigger ones, it didn’t matter how much tape I applied, I still wasn’t sure that the panels would stay in place so I added a few Command Damage-Free Picture Hanging strips like this directly to the cardboard and attached the bigger panels to the head board.

A Pat On the Back

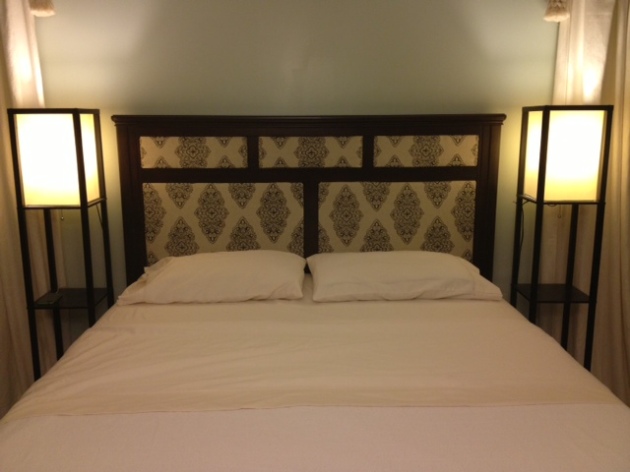
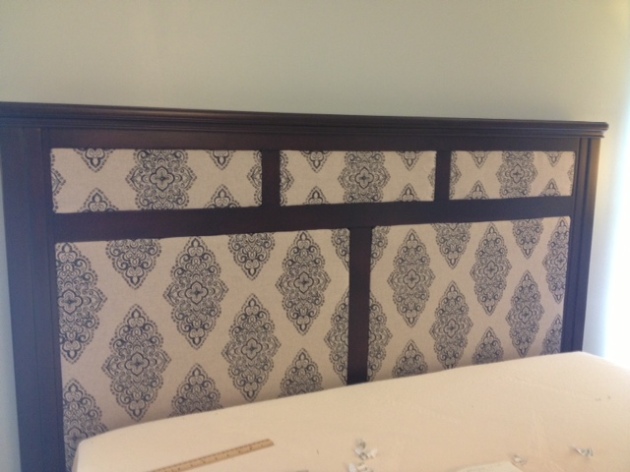
Next we stood back and admired our handiwork. Five years in the making, but totally worth it! Sometimes it’s all about getting that divine inspiration to get you kick started! And in case you were wondering, this whole project (the cutting and stapling and velcroing part, not the epic fabric part) took us all of 4 hours and that included a break for lunch and watching some Top Gear.

Image

Dominick’s Thought

While he’d been making comments throughout the entire process and saying how much he liked it (especially the Command strips), as we stood their basking in the beauty of our headboard, Dominick, without turning his head to look at me, goes, “Very nice baby! And if we ever want to change it, we can just add different fabric.” 🙂

HA! So until he decides he wants to change it up or until the headboard starts taunting me again, this is how we got an upholdersterd look by using cardboard and fabric! And all for less than $50!

Got anything that you are making over in your home that looks more permanent than it really is?